NetSuite CSV Import Errors occur when uploaded spreadsheet data fails NetSuite’s validation or processing checks. These problems often involve missing fields, incorrect mappings, duplicate records, or invalid references. These errors can prevent businesses from importing customer records, vendor details, invoices, bills, and journal entries. Such failures can also delay accounting work and affect financial reports. This guide explains the common error messages, their causes, and practical solutions.
What Do NetSuite CSV Import Errors Mean?
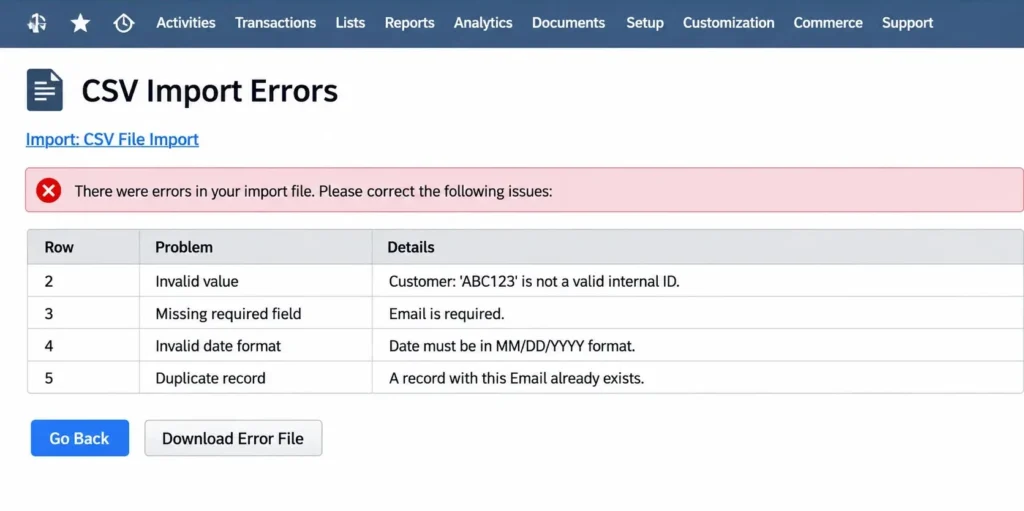
NetSuite CSV Import Errors mean NetSuite cannot properly read, validate, or process information from an uploaded CSV file. The system checks the data before creating or updating records.
What Happens When a CSV Import Fails?
- NetSuite rejects records with missing or incorrect information
- Required fields remain empty or contain invalid values
- Reference records do not match existing NetSuite records
- Some records fail while other records import successfully
- Incorrect mappings send information to the wrong fields
How Do CSV Imports Affect Accounting Operations?
- Customer and vendor records become incomplete
- Invoice and vendor bill processing gets delayed
- Journal entries fail to reach the accounting system
- Chart of accounts updates remain unfinished
- Financial reports may contain missing transaction details
- Bank and account reconciliation work requires additional checks
What Error Messages and Codes Appear During NetSuite CSV Imports?
NetSuite displays specific messages when imported information fails validation or processing.
Common NetSuite CSV Import Error Messages
- Record Already Exists: A customer, vendor, or transaction already has the same identifier
- Please Enter a Value for Amount: Missing Rate, Quantity, or item pricing prevents amount calculation
- Invalid Parent Reference Key: NetSuite cannot find the parent account due to incorrect names or import order
- Invalid Department Reference Key: The department is inactive, unavailable, or has an incorrect hierarchy name
- Invalid Entity Reference Key: NetSuite cannot match the customer or vendor due to incorrect references, currency settings, or transaction restrictions
- Invalid Tax Code Reference Key: The tax code is inactive or does not match the transaction’s subsidiary settings
- Advanced Intercompany Journal Entry Import Error: Incorrect subsidiary relationships or account settings prevent journal entry imports
- Record Does Not Exist: NetSuite cannot find the referenced customer, vendor, account, or item
- No Records Imported: NetSuite rejected all records because of validation or data errors
Do NetSuite CSV Import Errors Have Specific Error Codes?
- NetSuite uses descriptive messages for many CSV import failures
- Different record types can produce different validation messages
- Some technical errors may include additional system details
- Record the complete message instead of relying on an assumed numerical code
- Review the affected row, column, and value before changing the file
What Are the Signs of NetSuite CSV Import Errors?
Recognizing early warning signs helps businesses correct import problems before they affect accounting records.
- NetSuite displays a failed import notification
- The import results show “No Records Imported”
- Customer or vendor records remain missing
- Imported transactions contain incomplete information
- Duplicate records appear after an upload
- Journal entries fail to process
- Department or subsidiary references get rejected
- Financial reports show missing transaction details
- Expected approval workflows do not run
- Imported records contain incorrect amounts or dates
What Causes NetSuite CSV Import Errors?
Understanding the causes helps users select the correct repair instead of changing unrelated settings.
Incorrect Field Mapping
- CSV columns connect to the wrong NetSuite fields
- Required fields remain unmapped
- Source column names do not match the intended fields
- Transaction details map to incorrect sublist fields
Missing Required Information
- Customer or vendor details are missing
- Amount, Rate, or Quantity values are blank
- Required subsidiary information is unavailable
- Account or item details are incomplete
Incorrect Data Formatting
- Dates do not match NetSuite’s date preferences
- Numbers contain unsupported characters
- Currency values use incorrect formats
- Extra spaces change reference names
- CSV files use incorrect character encoding
Invalid Reference Records
- Referenced customers or vendors do not exist
- Departments or tax codes are inactive
- Subsidiary relationships are incorrect
- Account or item references do not match
- Parent records are missing
Duplicate Records and External ID Conflicts
- Existing records are imported as new entries
- External IDs are missing or repeated
- Incorrect Add or Update options are selected
- Transaction identifiers do not match existing records
Incorrect User Roles and Permissions
- Importing users lack the required permissions
- Users cannot access selected record types
- Certain fields are restricted
- Subsidiary access does not match the imported data
Incorrect Accounting and Feature Settings
- Multi-currency settings are incomplete
- Tax configurations do not match subsidiaries
- Intercompany accounts are incorrectly configured
- Required features are disabled
- Transaction settings do not support imported values
Incorrect Import Sequence
- Child accounts appear before parent accounts
- Transactions reference records that do not exist
- Customer and vendor records are not imported first
- Dependent records are uploaded before master records
How to Identify NetSuite CSV Import Errors Before Fixing Them
Check the import results and source file before changing accounting settings. These checks help narrow down the actual problem.
Check the Import Status
- Sign in to NetSuite using an authorized account
- Navigate to Setup
- Select Import/Export
- Open View CSV Import Status
- Locate the failed import job
- Review its status and available results
Review the Import Error Details
- Open the relevant import job
- Review the displayed error messages
- Identify rejected records
- Record the affected row numbers
- Note the column names and incorrect values
- Download the available error details when provided
Check the CSV File

- Open the original CSV file
- Review all column headings
- Identify blank required fields
- Check date and number formats
- Look for repeated identifiers
- Remove unnecessary blank rows
- Check special characters and file encoding
Verify NetSuite Field Mappings
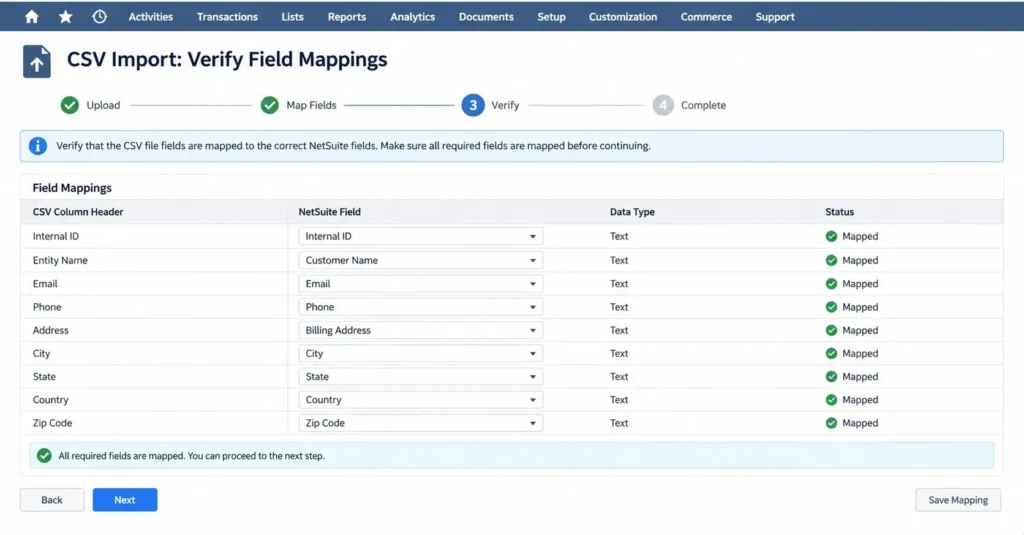
- Open the Import Assistant
- Select the appropriate record type
- Open the Field Mapping page
- Compare source columns with NetSuite fields
- Identify missing or incorrect mappings
- Confirm reference types for list fields
Check Existing NetSuite Records
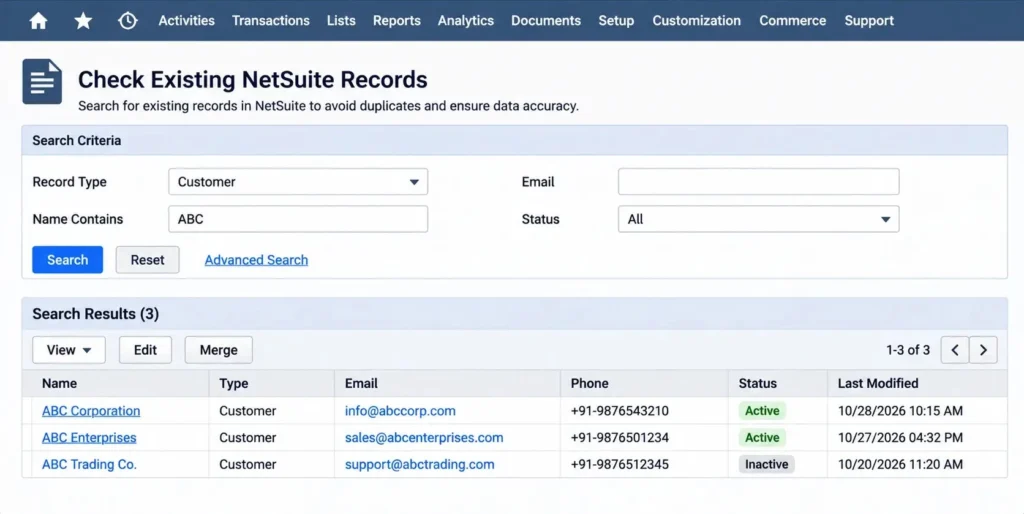
- Search for the referenced customer or vendor
- Verify account and department records
- Check subsidiary relationships
- Confirm tax codes and item records are active
- Compare External IDs with existing records
What Should You Prepare Before Fixing NetSuite CSV Import Errors?
Prepare the source data, permissions, and existing records before starting repairs. These checks help protect accurate accounting information.
Create a Backup of Existing Data
- Identify the affected record types
- Export important existing records when appropriate
- Save the original CSV file separately
- Keep a separate copy of corrected data
- Follow your company’s backup and recovery process
Check User Permissions
- Confirm access to CSV imports
- Verify permissions for the selected record type
- Check subsidiary and department access
- Confirm access to required fields
- Use an authorized account for import changes
Prepare and Validate the CSV File
- Use a consistent CSV template
- Confirm that every column has a heading
- Check all required values
- Verify dates, numbers, and currencies
- Remove unnecessary blank rows
- Save the file using supported character encoding
Check Existing Records and Dependencies
- Confirm that customers and vendors exist
- Verify parent accounts
- Check departments and subsidiaries
- Confirm that tax codes are active
- Review intercompany account settings
- Verify item and currency details
Test the Import in a Sandbox
- Use a small sample dataset
- Review field mappings
- Test record relationships
- Confirm successful processing
- Check imported amounts and account details
- Keep production data unchanged during testing
Method 1: Fix Incorrect CSV Field Mapping
Incorrect mappings send information to the wrong fields. Correct the mapping before running the import again.
Step 1: Open the CSV Import Setup
- Sign in to NetSuite
- Navigate to Setup
- Select Import/Export
- Choose Import CSV Records
Step 2: Select the Correct Record Type
- Select the appropriate import type
- Choose the required record type
- Select the correct data handling option
- Upload your CSV file
Step 3: Review Field Mappings
- Open the Field Mapping page
- Compare CSV columns with NetSuite fields
- Identify incorrect or missing mappings
- Check all mandatory fields
- Review transaction body and sublist fields
Step 4: Correct the Field Mappings
- Remove incorrect field associations
- Map each source column to its correct NetSuite field
- Include all required fields
- Select the correct reference type for list fields
- Confirm that transaction details use the correct sublist fields
Step 5: Validate and Test the Import
- Review all mapping selections
- Check the import settings
- Run a small test import
- Open the imported records
- Confirm that each value appears in its correct field
- Check whether the original error has disappeared
Method 2: Correct Missing Required Fields and Amount Values
Missing values prevent NetSuite from calculating transaction amounts. Check every required field before uploading the corrected file.
Step 1: Identify the Affected Transaction Records
- Open the failed import results
- Find the rejected invoice or vendor bill
- Record the affected row numbers
- Note the missing field names
Step 2: Open the Original CSV File
- Locate the saved CSV file
- Open it in a spreadsheet application
- Find the affected transaction rows
- Keep the original file unchanged
Step 3: Locate Blank Amount, Rate, and Quantity Fields
- Review the Amount column
- Check the Rate column
- Check the Quantity column
- Identify missing or incorrect values
- Confirm which fields the selected record type requires
Step 4: Check Item Records for an Available Base Price
- Open the related item record in NetSuite
- Review its pricing information
- Check whether a Base Price exists
- Confirm the correct price level when applicable
- Enter an approved value if the price is missing
Step 5: Enter the Correct Missing Values
- Add the correct quantity
- Enter the approved rate
- Complete other required transaction fields
- Avoid using estimated accounting values
- Confirm that zero is used only when appropriate
Step 6: Verify the Amount Calculations
- Multiply the rate by the quantity
- Compare the result with the expected amount
- Check applicable discounts and tax values
- Confirm that the transaction totals are correct
Step 7: Save the Corrected CSV File
- Review the completed rows
- Check number and currency formats
- Save the file in CSV format
- Keep a separate copy of the corrected file
Step 8: Upload and Test the Transaction Records
- Open the CSV Import Assistant
- Select the correct transaction type
- Upload the corrected file
- Review the field mappings
- Start the test import
- Open the imported transactions
- Confirm that the amounts appear correctly
Method 3: Correct Duplicate Records and External ID Conflicts
Duplicate identifiers can prevent NetSuite from creating or updating records correctly. Review existing records before changing identifiers.
Step 1: Identify the Duplicate Record Message
- Open the failed import results
- Find the Record Already Exists message
- Record the affected customer, vendor, or transaction
- Note the related External ID
Step 2: Review the External ID Column
- Open the CSV file
- Locate the External ID column
- Check for blank values
- Identify repeated identifiers
- Compare identifiers across related records
Step 3: Search for Existing Records in NetSuite
- Open the relevant record list
- Search using the External ID
- Locate matching customer or vendor records
- Check whether the transaction already exists
- Record the existing Internal ID when needed
Step 4: Compare CSV Identifiers with Existing Records
- Match each CSV identifier with its NetSuite record
- Check customer and vendor names
- Verify transaction numbers
- Identify records that need updates
- Separate genuinely new records
Step 5: Assign Unique External IDs Where Required
- Create unique identifiers for new records
- Maintain the same identifier for an existing record
- Avoid assigning one identifier to unrelated records
- Use consistent identifiers across connected imports
Step 6: Decide Whether the Import Should Add or Update Records
- Select Add for genuinely new records
- Select Update for existing records
- Choose Add or Update when both actions are required
- Confirm that the selected option matches your purpose
Step 7: Select the Correct Import Operation
- Open the Import Options page
- Review the Data Handling setting
- Select the appropriate operation
- Check the identifier mapping
- Confirm the import configuration
Step 8: Test the Corrected File
- Upload a small sample
- Run the import
- Check newly created records
- Verify updated records
- Confirm that no unintended duplicates appear
Method 4: Fix Chart of Accounts Import Errors
Incorrect account types and parent-child relationships can block account imports. Arrange the account structure before uploading the file.
Step 1: Open the Chart of Accounts CSV File
- Locate the original account import file
- Open it in a spreadsheet application
- Review account names and identifiers
- Identify all parent and child accounts
Step 2: Identify Parent and Child Accounts
- Separate main accounts from subaccounts
- Find the parent account for each child
- Check the existing account hierarchy
- Record missing parent accounts
Step 3: Check Account Names and Reference Values
- Compare account names with NetSuite records
- Review parent account references
- Check Internal IDs or External IDs
- Correct spelling and spacing differences
Step 4: Verify Account Types
- Review the account type column
- Compare values with available NetSuite account types
- Correct unsupported account type values
- Check whether the selected account type fits its purpose
Step 5: Move Parent Accounts Before Child Accounts
- Sort the CSV file by account hierarchy
- Place parent accounts first
- Place their child accounts afterward
- Keep related account information together
Step 6: Check Parent Account References
- Confirm that every child has the correct parent
- Verify parent identifiers
- Remove references to missing accounts
- Check the account hierarchy again
Step 7: Review Subsidiary Assignments
- Check the subsidiary assigned to each account
- Confirm that the account is available to that subsidiary
- Correct mismatched subsidiary references
- Review shared account settings where applicable
Step 8: Save and Import Parent Accounts First
- Save the corrected CSV file
- Select the appropriate account record type
- Map the required account fields
- Import the parent accounts
- Confirm that NetSuite creates them successfully
Step 9: Import Child Accounts
- Prepare the child account CSV file
- Verify parent account references
- Select the correct import operation
- Upload the child account records
- Review the import results
Step 10: Verify the Account Hierarchy
- Open the Chart of Accounts
- Search for the imported parent accounts
- Open the related child accounts
- Confirm their parent relationships
- Check account types and subsidiary assignments
Method 5: Correct Invalid Department and Entity Reference Keys
Invalid references usually involve missing records, incorrect names, or restricted settings. Verify each related record before changing the CSV values.
Step 1: Identify the Rejected Department or Entity
- Open the import results
- Find the Invalid Department Reference Key message
- Check for Invalid Entity Reference Key messages
- Record the affected row numbers
- Note the rejected reference values
Step 2: Open the Related Record in NetSuite
- Navigate to the department list
- Search for the affected department
- Open the related customer or vendor record
- Compare the record details with the CSV file
Step 3: Check Whether the Department or Entity Exists
- Search using the department name
- Search using the customer or vendor identifier
- Confirm that the intended record exists
- Check for spelling and spacing differences
Step 4: Confirm That the Record Is Active
- Open the department record
- Check its inactive status
- Review the customer or vendor status
- Activate records only when properly authorized
Step 5: Verify Department Parent-Child Hierarchy
- Check the department’s parent record
- Confirm the complete department name
- Use the correct hierarchy format
- Match the CSV value with the NetSuite record
Step 6: Check Subsidiary Assignments
- Open the department record
- Review its subsidiary restrictions
- Compare the subsidiary with the imported transaction
- Correct invalid subsidiary references
Step 7: Verify Customer or Vendor Currency Settings
- Open the customer or vendor record
- Review its currency settings
- Confirm that the required currency is enabled
- Check whether the transaction uses an accepted currency
Step 8: Confirm the Entity Supports the Selected Transaction Type
- Review the selected customer or vendor
- Check the transaction type
- Confirm that the entity can be used for that transaction
- Verify applicable subsidiary restrictions
Step 9: Review Importing-User Permissions
- Check the user’s assigned NetSuite role
- Review record access permissions
- Confirm subsidiary access
- Verify access to the required fields
Step 10: Correct the CSV Reference Values
- Replace incorrect department names
- Correct customer and vendor references
- Use the appropriate Internal ID or External ID
- Save the updated CSV file
Step 11: Upload a Small Test File
- Open the Import Assistant
- Upload the corrected sample
- Review reference field mappings
- Start the test import
- Verify the imported department and entity details
Method 6: Fix Invalid Tax Code Reference Key Errors
Tax code problems can stop invoices, sales orders, and vendor bills from importing. Check tax settings against the transaction details.
Step 1: Identify the Rejected Tax Code
- Open the import error results
- Locate the Invalid Tax Code Reference Key message
- Record the rejected tax code
- Note the affected transaction rows
Step 2: Open the Tax Code Records in NetSuite
- Navigate to the tax code list
- Search for the rejected code
- Open the matching tax code record
- Review its configuration
Step 3: Check Whether the Tax Code Is Active
- Review the tax code’s inactive status
- Confirm that the code is available
- Check whether the record is correctly configured
- Request authorized changes when necessary
Step 4: Verify Subsidiary and Nexus Settings
- Review the transaction subsidiary
- Check the tax code’s subsidiary restrictions
- Confirm the applicable tax nexus
- Match the tax setup with the transaction
Step 5: Check Tax Code Compatibility With the Item
- Open the related item record
- Review its tax settings
- Check whether the tax code applies
- Confirm that the item uses the correct tax treatment
Step 6: Review Applicable Location and Entity Settings
- Check the transaction location
- Review customer or vendor details
- Confirm the relevant tax settings
- Correct any mismatched references
Step 7: Replace Invalid Tax Code References
- Open the CSV file
- Find the rejected tax code values
- Replace them with valid configured codes
- Check all affected transaction rows
Step 8: Save the Corrected CSV File
- Review the updated tax code column
- Check the file format
- Save the corrected file
- Keep the original version separately
Step 9: Run a Small Test Import
- Upload a sample transaction file
- Review the tax code mapping
- Start the import
- Check the import results
Step 10: Verify Transaction Tax Calculations
- Open the imported invoices or bills
- Check the selected tax codes
- Review tax amounts
- Confirm that transaction totals are correct
Method 7: Correct Advanced Intercompany Journal Entry Errors
Intercompany journal entries require matching subsidiaries and valid accounts. Check each journal line before importing the corrected file.
Step 1: Open the Failed Journal Entry Import
- Navigate to CSV Import Status
- Find the failed journal entry job
- Open its error details
- Record the rejected journal lines
Step 2: Identify the Affected Subsidiaries
- Open the journal entry CSV file
- Review the subsidiary column
- Identify the originating subsidiary
- Record the related destination subsidiaries
Step 3: Review the Due To/From Subsidiary Field
- Locate the Due To/From Subsidiary field
- Check its value on each applicable line
- Identify missing subsidiary references
- Compare values with the intended transaction
Step 4: Compare Subsidiary Values With Journal Entry Lines
- Review every journal entry line
- Match each line with its subsidiary
- Check the related intercompany subsidiary
- Identify mismatched relationships
Step 5: Correct Mismatched Subsidiary References
- Replace incorrect subsidiary identifiers
- Enter valid subsidiary references
- Check the Due To/From Subsidiary values
- Confirm the required relationships
Step 6: Open the Related GL Account Records
- Navigate to the Chart of Accounts
- Search for the related GL accounts
- Open each account record
- Review account settings
Step 7: Verify Intercompany Account Configuration
- Confirm that the accounts support intercompany transactions
- Check subsidiary restrictions
- Review account relationships
- Correct invalid account references
Step 8: Check Elimination Account Settings
- Review the intercompany elimination accounts
- Confirm the correct account assignments
- Check the applicable subsidiaries
- Verify the required consolidation settings
Step 9: Review Journal Entry Debit and Credit Lines
- Check every debit amount
- Review every credit amount
- Confirm that total debits equal total credits
- Verify subsidiary assignments on each line
- Check account references again
Step 10: Upload the Corrected Journal Entry File
- Save the updated CSV file
- Open the Import Assistant
- Select Advanced Intercompany Journal Entry
- Upload the corrected file
- Review all field mappings
- Start the import
Step 11: Verify Imported Journal Entries and Elimination Settings
- Open the imported journal entries
- Check subsidiary details
- Review debit and credit balances
- Confirm intercompany account assignments
- Verify elimination settings
- Check the related financial records
Method 8: Fix Record Does Not Exist and Import Sequence Errors
Missing records and incorrect import order can break connected transactions. Import master records before dependent transactions.
Step 1: Identify the Missing Record Reference
- Open the failed import results
- Find the Record Does Not Exist message
- Record the rejected field
- Note the affected row number
Step 2: Check the External ID or Internal ID
- Open the CSV file
- Locate the identifier column
- Check the External ID or Internal ID
- Identify missing or incorrect values
Step 3: Search for the Referenced Record in NetSuite
- Open the relevant record list
- Search using the identifier
- Check customer, vendor, account, or item records
- Confirm whether the record exists
Step 4: Confirm That the Record Exists and Is Active
- Open the matching record
- Review its status
- Check its subsidiary restrictions
- Confirm that it supports the intended transaction
Step 5: Correct Incorrect Identifiers in the CSV File
- Replace incorrect identifiers
- Remove references to unavailable records
- Match values with existing NetSuite records
- Save the corrected file
Step 6: Identify Dependent Records
- Review customer and vendor relationships
- Identify parent and child accounts
- Check transaction references
- List records that depend on other records
Step 7: Arrange Imports in the Correct Sequence
- Prepare separate files for different record types
- Identify the required import order
- Place master records before dependent records
- Review parent-child relationships
Step 8: Import Parent and Master Records First
- Import customers and vendors when required
- Import parent accounts
- Import departments and other reference records
- Confirm successful creation before proceeding
Step 9: Import Dependent Transactions Afterward
- Prepare the transaction CSV file
- Check all reference identifiers
- Map customer, vendor, account, and item fields
- Upload dependent transactions
- Review the import results
Step 10: Run a Test Import
- Select a small representative dataset
- Upload the test file
- Review field mappings
- Start the import
- Check successful and rejected records
Step 11: Review Rejected Records and Confirm Successful Processing
- Open the latest import results
- Review remaining error messages
- Correct rejected rows
- Confirm that expected records exist
- Check transaction details and account relationships
How to Verify Whether NetSuite CSV Import Errors Are Fixed
A completed upload does not always mean every record is correct. Check the import status, accounting details, and related workflows.
Check CSV Import Status
- Open Setup
- Select Import/Export
- Choose View CSV Import Status
- Find the latest import job
- Review its final status
- Check successful and rejected records
- Open available error details
Verify Imported Records
- Open the imported customer or vendor records
- Check invoice and bill details
- Verify amounts, accounts, and subsidiaries
- Confirm department and tax information
- Compare imported values with the original CSV file
Review Accounting Reports
- Open the relevant financial reports
- Verify journal entry balances
- Review account balances
- Check transaction dates and amounts
- Confirm that imported transactions appear correctly
- Investigate missing or unexpected balances
Test Related Workflows
- Check approval workflows
- Review automated record updates
- Verify related accounting processes
- Confirm that imported records trigger expected actions
- Check that no unexpected records were created
How NetSuite CSV Imports and ERP Integration Affect Accounting Data
CSV imports connect spreadsheets and external applications with ERP records.
How CSV Imports Support ERP Data Exchange
- Customer and vendor information moves between systems
- Financial transactions enter the accounting system
- Chart of accounts records support consistent reporting
- Inventory and item records stay organized
- Subsidiary information supports multi-company accounting
Common ERP Integration Problems
- Different systems use inconsistent data formats
- Incorrect field mappings transfer information incorrectly
- Duplicate records create unnecessary entries
- Missing references interrupt data exchange
- Synchronization problems create outdated records
- Incorrect permissions restrict data access
How to Maintain Accurate Accounting Data
- Standardize data formats across connected systems
- Validate records before importing
- Maintain consistent identifiers
- Review integration settings regularly
- Monitor import results
- Check financial records after data transfers
How to Prevent NetSuite CSV Import Errors in the Future
Regular data checks reduce repeated import failures. Follow these practices to keep accounting information accurate and organized.
- Use standardized CSV templates for recurring imports
- Verify required fields before uploading files
- Maintain unique External IDs for records
- Check parent-child record relationships
- Keep customer and vendor information updated
- Confirm subsidiary and currency settings
- Review tax code configurations
- Maintain correct user permissions
- Test new import mappings in a sandbox
- Follow the correct import sequence
- Review CSV Import Error Reporting after each import
- Monitor rejected records and correct them promptly
- Maintain regular data backups
- Check date formats and character encoding
- Divide large files into smaller import batches
Conclusion
NetSuite CSV Import Errors can delay accounting work and affect financial data accuracy. Missing fields, incorrect mappings, duplicate records, and invalid references are common causes. Test every correction before processing the complete file. Regular validation and proper import controls help prevent recurring failures.
Accounting Assist Pro provides professional bookkeeping, accounting, and financial reporting services to support accurate business records. Contact Accounting Assist Pro for help managing your accounting operations.
Frequently Asked Questions
1. What are NetSuite CSV Import Errors?
NetSuite CSV Import Errors occur when uploaded data fails NetSuite’s validation checks. Common reasons include missing fields, incorrect mappings, duplicate identifiers, invalid references, and permission restrictions.
2. Why does NetSuite show No Records Imported?
NetSuite displays this message when it cannot process the submitted records. Missing required values, invalid references, incorrect mappings, and unsupported data formats can cause this result.
3. How do I fix a CSV Import Error in NetSuite?
Identify the rejected row, check its field mapping, and correct missing values. Verify reference records and permissions, then upload a small test file before retrying.
4. What causes Invalid Entity Reference Key errors?
These errors occur when NetSuite cannot match a customer or vendor reference. Incorrect identifiers, currency restrictions, subsidiary settings, and transaction permissions can cause this problem.
5. How do I fix Invalid Department Reference Key errors?
Check whether the department exists and remains active. Verify its complete hierarchy name and subsidiary assignment. Correct the CSV reference and test the import again.
6. Why does NetSuite show Please Enter a Value for Amount?
NetSuite displays this message when required amount information is missing. Check the Rate and Quantity fields, item pricing, and transaction field mappings before importing again.
7. How do I fix duplicate record errors during CSV imports?
Search for the existing record and compare its External ID with the CSV value. Choose the correct Add or Update option and test the corrected file.
8. Can incorrect field mapping cause NetSuite CSV Import Errors?
Yes. Incorrect mappings send information to the wrong fields or leave required fields empty. Review the Field Mapping page and connect every source column correctly.
9. How can I check failed CSV imports in NetSuite?
Navigate to Setup, select Import/Export, and open View CSV Import Status. Find the failed job and review its messages, affected rows, and available error details.
10. How can I prevent CSV Import Errors in NetSuite?
Use standardized templates, unique identifiers, and correct field mappings. Check required values, reference records, permissions, and import sequences before uploading large datasets.