
Installing QuickBooks Desktop starts with checking system requirements, downloading the correct version, and preparing your license details. The process then moves through the installer, installation type, setup location, activation, and updates. A standalone computer usually needs Express Install, while network environments require Custom and Network Options. This guide explains how to install QuickBooks Desktop on one computer, workstations, servers, and multi-user networks.
What to Do Before Installing QuickBooks Desktop
Before you install QuickBooks Desktop, prepare your computer and installation details. These checks prevent avoidable installation interruptions and protect your accounting data.
Check System Requirements
- Check requirements for your exact QuickBooks Desktop version
- Confirm that your Windows version is supported
- Check available storage and system resources
- Review Intuit’s current requirements before downloading
For example, Intuit states that QuickBooks Desktop 2024 requires 64-bit Windows. It also lists 2.4 GHz as the minimum processor requirement. Workstations need at least 8 GB RAM.
Download the Correct Version
- Open Intuit’s Downloads and Updates page
- Select your country
- Select your QuickBooks Desktop product
- Select your version
- Select Search
- Select Download
- Save the file somewhere easy to find
Intuit recommends saving the downloaded installation file in an accessible location.
Keep Product and License Numbers Ready
Keep these details available before starting:
- Purchase email
- Original product package
- Customer Account Management Portal
- Intuit account
- Existing company file, when applicable
If you cannot find the numbers, use Intuit’s available lookup options before continuing.
Back Up Existing Company Data
- Create a current company-file backup
- Back up data before upgrading or moving QuickBooks Software
- Keep previous accounting records available when necessary
- Store the backup separately from the working company file
Read More:- QuickBooks Backup & Restore Errors
How to Install QuickBooks Desktop Step by Step
The actual install QuickBooks Desktop process begins after your installer and license details are ready. First, confirm your internet connection and locate QuickBooks.exe. Then accept the license agreement, enter your product information, and choose the correct installation type. Express Install suits a standard single-computer setup. Custom and Network Options support workstations, servers, shared files, and customized installation locations.
Step 1: Confirm Your Internet Connection
Make sure the computer has an active internet connection before starting.
Keep the connection active throughout installation, activation, and updating. A stable connection also helps when QuickBooks needs to verify your product information.
Step 2: Locate the QuickBooks Desktop Installer
The downloaded file is generally named QuickBooks.exe.
Locate the file in your Downloads folder or saved location. Double-click the file to start the setup wizard.
If the setup does not start automatically, open the downloaded file manually. Wait for the installation window to appear before continuing.
Step 3: Start the Installation
The QuickBooks Desktop installer displays the setup instructions.
Select Next when prompted. Review the Software License Agreement carefully. Then select Accept and Continue to proceed.
Do not close the installer while QuickBooks processes the setup.
Step 4: Enter Your Product and License Numbers
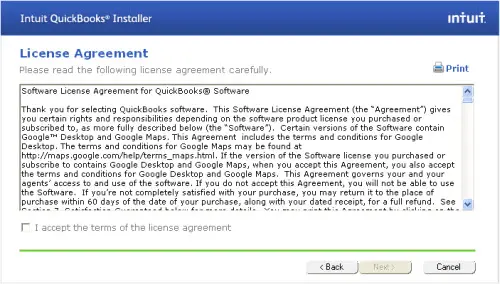
QuickBooks asks for your product and license numbers during installation.
Enter both numbers carefully. Then select Next to continue.
Incorrect numbers can prevent the installation from proceeding. Check every character before submitting the information.
What If You Cannot Find Your Numbers?
You can recover the required details through several sources:
- Select the available lookup option
- Sign in to your Intuit account
- Check CAMPs
- Use the business phone number recovery option
- Check your purchase email
- Check the original product package
- Review your existing company file when applicable
Keep the recovered numbers available before returning to the installation window.
Step 5: Choose Your Installation Type
QuickBooks provides two primary installation choices.
- Express Install
- Custom and Network Options
Choose Express Install for a straightforward standalone computer. Select Custom and Network Options for servers, workstations, multiple computers, or custom installation locations.
This choice determines the remaining installation steps.
Read More:- Fix QuickBooks Installation Errors
Express Install: Complete Installation Steps
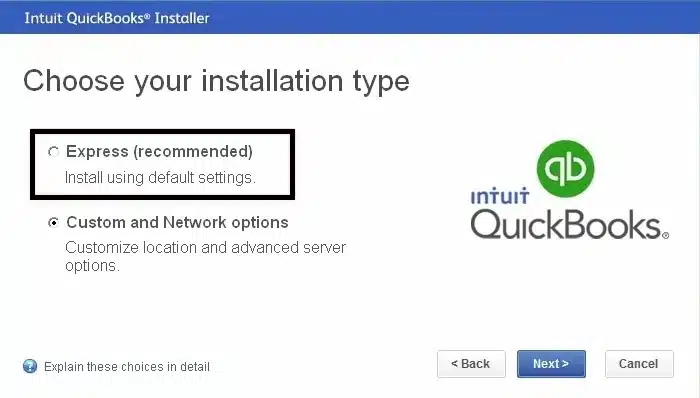
Express Install provides the simplest QuickBooks Desktop install for a standard computer.
Step 6: Select Express Install
Select Express Install and then select Next.
Choose this option when QuickBooks will run on one computer. It also suits first-time users and straightforward reinstallations.
Step 7: Start the Installation
Select Install to begin.
QuickBooks now copies the required files and completes the software setup. Allow the process to finish without closing the installation window.
The installation may take several minutes depending on the computer.
Step 8: Open QuickBooks
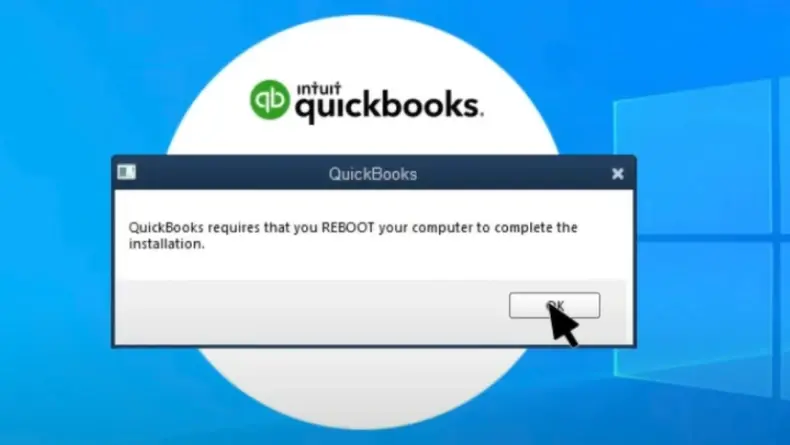
Select Open QuickBooks after installation finishes.
If QuickBooks asks you to restart Windows, save your work and restart the computer. Then open QuickBooks again.
Express Install normally uses the standard installation location. Existing installations may also display upgrade or installation-location options.
Custom and Network Install: Complete Installation Steps
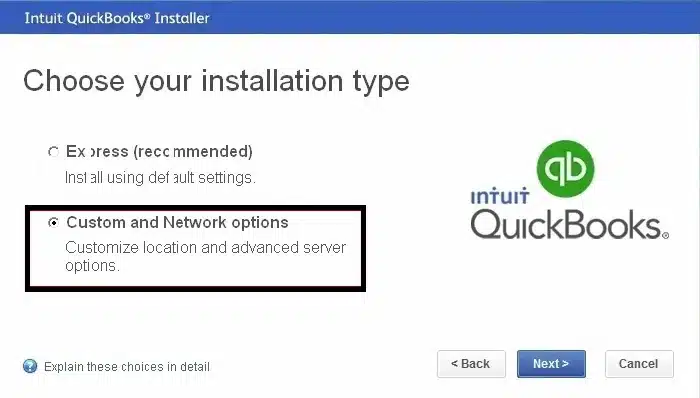
Custom and Network Options provide a more flexible QuickBooks Desktop installer path. Use this option for servers, workstations, shared company files, or non-default installation locations.
Step 6: Select Custom and Network Options
Select Custom and Network Options and then select Next.
QuickBooks now asks how you plan to use the software. Choose the option that matches your computer’s role.
Step 7: Choose How QuickBooks Will Be Used
QuickBooks provides three main setup choices.
Option 1: QuickBooks Desktop on This Computer
Choose this option when:
- QuickBooks runs on this computer
- The computer works as a workstation
- Company files are stored elsewhere
- The computer accesses files through a network
This option installs QuickBooks locally without making the computer a company-file host.
Option 2: QuickBooks Desktop and Company Files on This Computer
Choose this option when:
- QuickBooks runs on this computer
- Company files are stored here
- Other users need access to those files
- The computer acts as a server or host
- You use a Terminal Server environment
Read More:- Fix QuickBooks Company File Errors
This setup combines QuickBooks access and company-file storage on the same computer.
Option 3: QuickBooks Desktop Not Used on This Computer
Choose this option when:
- The computer only stores company files
- QuickBooks does not run on the server
- Other computers access the shared files
- Database Server Manager handles file access
This setup is appropriate for a dedicated file server.
Choosing the correct option matters because each setup serves a different network role.
Step 8: Select the Installation Location
Select Next after choosing the appropriate setup.
If you need another location, select Change the Install Location. Select Browse, choose the destination folder, and confirm your selection.
Use the default location unless your setup requires another folder.
If multiple QuickBooks versions need separate installations, use unique folders. Intuit specifically recommends separate folders when installing multiple versions or editions.
Step 9: Start the Custom Installation
Select Next to begin installing QuickBooks.
Wait until the installation finishes. Then select Open QuickBooks.
Do not interrupt the installation while Windows copies or configures QuickBooks files.
Step 10: Restart the Computer If Prompted
Some installations may request a Windows restart.
Save your open work before restarting. After Windows loads, open QuickBooks and continue with activation.
What to Set Up Immediately After Installation
After you install QuickBooks Desktop, complete activation and updates before using the software for regular accounting work.
Step 11: Activate QuickBooks Desktop
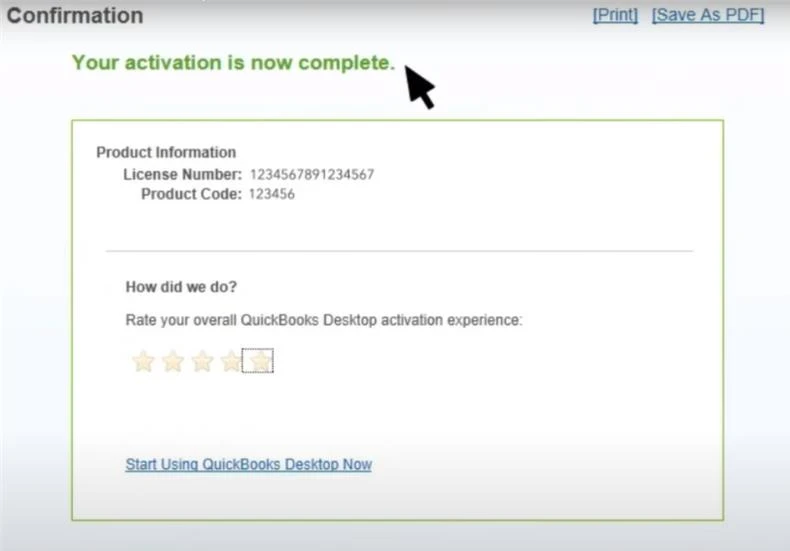
QuickBooks normally prompts you to activate after installation.
Select Begin Activation and follow the displayed instructions. Verify your information and complete the activation process.
If the prompt does not appear, use this path:
- Open QuickBooks
- Select Help
- Select Activate QuickBooks Desktop
- Follow the instructions
- Complete activation
Intuit confirms that activation can be started manually through Help → Activate QuickBooks Desktop.
Step 12: Register QuickBooks Desktop
Registration is separate from activation.
- Open QuickBooks
- Select Help
- Select Register QuickBooks
- Enter the requested information
- Complete the registration process
Registration becomes particularly useful when setting up QuickBooks on another computer.
Step 13: Update QuickBooks Desktop
Check for available updates after activation.
Install the latest applicable update and restart QuickBooks when prompted. Updating helps keep the installed release current.
Read More:- Fix QuickBooks Update Errors
How to Set Up QuickBooks Desktop on a Network
A network installation needs additional configuration after the main install QuickBooks Desktop process. Keep the company files on an accessible shared folder and configure the server before testing workstations.
Step 14: Install QuickBooks Database Server Manager
Install Database Server Manager on the server when required.
Use it when the server stores company files without running QuickBooks Desktop. After installation, scan the folders containing your company files.
Step 15: Create the Shared Company-File Folder
- Create the folder on the server
- Store company files inside it
- Give authorized users access
- Confirm administrator permissions
- Keep the folder accessible from workstations
Step 16: Install QuickBooks on Each Workstation
- Run the QuickBooks Desktop installer
- Select Custom and Network Options
- Choose the workstation option
- Complete the installation
- Repeat the process on required computers
Step 17: Enable Multi-User Hosting
Open QuickBooks on the server and follow these steps:
- Select File
- Select Utilities
- Look for Stop Hosting Multi-User Access
If this option appears, hosting is enabled.
If only Database Server Manager is installed, scan the company-file folders instead.
Step 18: Scan Company Files
Open Database Server Manager and select the folder containing your company files.
Run the scan and allow the manager to identify the files. Then verify that workstations can access the shared company files.
Step 19: Configure Firewall and Security
- Allow required QuickBooks communication
- Check Windows Firewall settings
- Review third-party security software
- Make sure security tools do not block network access
Step 20: Map the Network Drive
- Locate the shared company-file folder
- Map it as a network drive
- Configure the mapped drive on workstations
- Verify folder permissions
- Test company-file access
How to Check Network Speed Before Using QuickBooks
Intuit’s supplied guidance specifies 40 Mbps or higher for network bandwidth.
To test the connection:
- Use a file measuring at least 150 MB
- Place it in the shared folder
- Copy it to a workstation
- Record the transfer time
- Calculate the speed
Formula:
File size in MB × 8 ÷ copy time in seconds = Mbps
For example, a 150 MB file copied in 25 seconds produces 48 Mbps.
How to Install QuickBooks Desktop on a New Computer
When you install QuickBooks Desktop on a new computer, protect the company file first. Check the new computer’s requirements and keep your license information ready.
If the Old Computer Is Available
- Back up the company file
- Check the new computer’s requirements
- Use the QuickBooks Migrator Tool
- Follow the migration instructions
- Verify the transferred installation
- Open the company file
If the Old Computer Is Unavailable
- Download the correct QuickBooks version
- Run QuickBooks.exe
- Enter product and license numbers
- Select the appropriate installation type
- Complete activation
- Register the installation
- Restore the company-file backup
How to Install QuickBooks Desktop Without a CD
You can install QuickBooks without physical installation media.
Download Method
- Download the correct version
- Save the installer
- Run QuickBooks.exe
- Complete the normal setup
Another Computer With a CD Drive
- Access the installation media from another computer
- Transfer the required setup files
- Run the installer on the target computer
USB Method
- Copy the installation files to a USB drive
- Connect the USB drive to the target computer
- Run the installer
- Complete the setup
How to Perform a Clean Install QuickBooks Desktop
A clean install QuickBooks Desktop process is useful when a normal reinstall repeatedly fails.
When to Use It
- Existing installation is damaged
- Normal installation repeatedly fails
- Reinstallation does not solve the issue
- Previous installation components interfere with setup
Basic Process
- Back up company files
- Keep product and license information ready
- Remove the existing QuickBooks installation
- Restart Windows when required
- Download a fresh installer
- Run the QuickBooks Desktop installer
- Select the correct installation type
- Complete installation
- Activate QuickBooks
- Restore or reconnect the company file
Do not remove or rename QuickBooks folders unless the current Intuit procedure specifically instructs you to do so.
How to Perform a Silent QuickBooks Desktop Install
A silent installation is an advanced deployment method. Most users should use the normal QuickBooks installer instead.
Prepare the Installation Package
- Download the required QuickBooks package
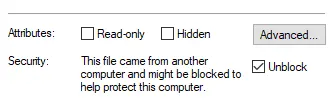
- Right-click the downloaded file
- Select Properties
- Select Unblock, when available
- Select OK
- Install 7-Zip
- Extract the QuickBooks Enterprise package
Configure the MSI Package
- Set up Microsoft Orca
- Open the extracted package
- Locate QuickBooks.Msi
- Open the MSI file in Orca
- Apply the required transform
- Use QuickbooksNoLicense when applicable
- Enter QB LICENSENUM
- Enter QB PRODUCTNUM
- Use Transform → New Transform if necessary
- Adjust the required rows
- Save the transformed MSI
- Deploy the package
Conclusion
A successful install QuickBooks Desktop process starts with the correct version, system requirements, license details, and company-file backup. After installation, activate, register, update, and verify your company file before regular use. Following these steps makes it easier to install QuickBooks Desktop correctly without skipping critical setup requirements.
For accounting support, connect with Accounting Assist Pro for accurate and timely accounting solutions.
FAQs
1. How do I install QuickBooks Desktop?
Download the correct installer, open QuickBooks.exe, enter your product details, and select an installation type. Follow the on-screen steps to complete the setup.
2. What do I need before I install QuickBooks Desktop?
Check the system requirements, download the correct version, and keep your product and license numbers ready. Back up your company files before upgrading or moving QuickBooks.
3. Which installation type should I choose?
Choose Express Install for a standard single-computer setup. Choose Custom and Network Options for workstations, servers, shared files, or multiple computers.
4. How do I use the QuickBooks Desktop installer?
Open QuickBooks.exe and accept the license agreement. Enter your product and license numbers, choose the installation type, and complete the prompts.
5. How do I install QuickBooks Desktop on a server?
Choose Custom and Network Options during setup. Select the server option that matches your network structure and install Database Server Manager when required.
6. How do I install QuickBooks Desktop on multiple computers?
Install QuickBooks Desktop on each workstation and set up the company file folder on the server. Then enable multi-user hosting and test network access.
7. Do I need Database Server Manager?
You need Database Server Manager when a computer stores QuickBooks company files for network access. A dedicated file server can use it without the full QuickBooks application.
8. How do I activate QuickBooks Desktop?
Open QuickBooks and select Help > Activate QuickBooks Desktop. Follow the prompts to verify your license and complete activation.
9. How do I install QuickBooks Desktop on a new computer?
Download the correct installer and enter your existing product and license numbers. Install QuickBooks, activate it, then restore or migrate your company files.
10. Can I install QuickBooks Desktop without a CD?
Yes. Download the installer directly from Intuit when available. You can also transfer an installer from another computer using suitable storage media.
11. How do I perform a clean install QuickBooks Desktop?
Back up your company files first, remove the existing installation, restart your computer, and install a fresh copy. Activate QuickBooks and reconnect your company files afterward.
12. Why is the QuickBooks Desktop installer not working?
Check your system requirements, administrator permissions, internet connection, and security settings. Restart your computer and use Intuit’s recommended repair tools if needed.