
In cases where QuickBooks Hosting Mode is off, there could be challenges while opening the company file. Misconfigured hosting settings on the server and database services not running can be the cause of this issue. Other reasons are damaged network files, limited folder permissions, and firewall blockage. Such errors will hinder employees from sharing the same company file. This article covers various reasons and solutions to this problem.
What Does QuickBooks Hosting Mode is Off Mean?
QuickBooks Hosting Mode is Off error means the computer hosting your company file cannot provide proper network access. QuickBooks Desktop uses hosting to let multiple users work with one company file. The hosting computer acts as the server, while other computers connect as workstations.
Common QuickBooks Hosting Mode Error Messages and Codes
You may encounter these messages when network hosting stops working:
- “QuickBooks Hosting Mode is Off”
- “QBDBMgrN not running on this computer”
- “An error occurred when QuickBooks tried to access the company file”
- QuickBooks Error H101
- QuickBooks Error H202
- QuickBooks Error H303
- QuickBooks Error H505
- QuickBooks 6000-series errors
QuickBooks Multi-User Hosting System Requirements
Your server and workstations must meet the requirements for your QuickBooks Desktop release.
| Requirement | Recommended configuration |
| Server operating system | Windows Server 2016 or later |
| Workstation operating system | Windows 10 64-bit or later |
| Processor | 2.4 GHz Intel or AMD x86 processor |
| RAM | 8 GB for 1–5 users; 12 GB for up to 10; 16 GB for up to 15; 20 GB for 20 or more |
| Installation storage | At least 2.5 GB free space |
| Storage type | SSD recommended |
| Framework | .NET Framework 4.8 Runtime |
| Network | 100 Mbps wired connection minimum; 1 Gbps recommended |
| QuickBooks version | Compatible releases across all computers |
| Database Server Manager | Matching release installed on the hosting server |
| Network settings | Network Discovery and File and Printer Sharing enabled |
| Database services | QuickBooksDBXX and QBCFMonitorService configured correctly |
Check the system requirements for your installed QuickBooks release before upgrading hardware or software.
Understand the Three Hosting Modes in QuickBooks Desktop
QuickBooks Desktop provides three hosting modes. Understanding their differences helps you configure the server and workstations correctly.
Not Hosting
- QuickBooks does not provide multi-user hosting from that computer
- The computer accesses company files locally
- This is the correct setting for regular workstations
- Workstations do not act as servers
Hosting Local Files Only
- The computer hosts company files stored on its own hard drive
- QuickBooks Database Server Manager runs as a Windows service
- Other computers can connect to files stored on this server
- This mode suits a designated server storing company files locally
Hosting Local and Remote Files
- The computer can host local company files
- It can also host remote network files
- QuickBooks Database Server Manager runs under the logged-in Windows user
- This setup is less commonly recommended
Which Computer Should Enable Hosting?
- The designated server should host the shared company file
- All regular workstations should have hosting turned off
- Avoid enabling hosting on multiple computers
- Keep the company file in an accessible shared folder
Common Causes of QuickBooks Hosting Mode Off
Several configuration and network problems can trigger this issue. Identifying the cause helps you choose the correct solution.
- Hosting disabled on the server: The server cannot provide multi-user access when hosting is turned off
- Multiple hosting computers: More than one computer may be trying to host the same company file
- Stopped database services: QuickBooksDBXX or QBCFMonitorService may not be running
- Missing Database Server Manager: The server may lack the required database management tool
- Damaged network files: Incorrect .ND or .TLG files may interrupt company file connections
- Company file problems: File damage can prevent QuickBooks from opening shared data
- Incorrect service permissions: QBDataServiceUserXX may lack access to the company file folder
- Firewall restrictions: Windows Firewall may block required QuickBooks ports or programs
- Antivirus restrictions: Security software may block QuickBooks network activity
- Disabled Network Discovery: Workstations may not find the hosting computer
- Incorrect network settings: IP address or hostname problems may interrupt communication
- Unshared company file location: Workstations may not access the folder containing the file
- Version differences: Incompatible QuickBooks releases may cause network problems
- Damaged installation: Missing or damaged program files may affect hosting services
Signs and Symptoms of QuickBooks Hosting Mode is Off
The problem can affect company file access, network connections, and daily accounting work.
- QuickBooks displays a Hosting Mode is Off message
- QBDBMgrN is not running on the computer
- Users cannot switch to Multi-User Mode
- Only one person can open the company file
- Workstations cannot connect to the server
- QuickBooks displays H101, H202, H303, or H505 errors
- QuickBooks displays 6000-series company file errors
- The software freezes during multi-user access
- Users experience slow performance or connection interruptions
- Changes made by different users may not appear as expected
How to Identify QuickBooks Hosting Mode is Off
Check the hosting settings and database services before changing advanced network settings.
- Open QuickBooks Desktop on the server
- Select File > Utilities
- Check whether Host Multi-User Access or Stop Hosting Multi-User Access appears
- Repeat the same check on every workstation
- Open Windows Services and find QuickBooksDBXX
- Check whether QBCFMonitorService is running
- Confirm Database Server Manager is installed
- Check whether the company file is stored in a shared folder
- Test whether workstations can reach the server
Prerequisites Before Fixing QuickBooks Hosting Mode is Off
Prepare your system before starting the troubleshooting process.
- Confirm the company file is stored on the designated server
- Make sure the server and workstations use compatible QuickBooks versions
- Verify that all computers share the same network
- Confirm the company file folder is accessible
- Sign in using a Windows administrator account
- Check that Database Server Manager is installed
- Restart QuickBooks and affected computers
- Create a company file backup before making file-related changes
How to Fix QuickBooks Hosting Mode is Off: Four-Phase Troubleshooting Guide
Follow these four phases in order to fix the QuickBooks Hosting Mode is Off issue:
- Phase 1: Verify Initial Settings – Check hosting settings, database services, Database Server Manager, and network sharing
- Phase 2: Use QuickBooks Troubleshooting Tools – Rename network files, run File Doctor, and scan company file folders
- Phase 3: Perform System and Network Checks – Review folder permissions, firewall rules, ports, and network connectivity
- Phase 4: Apply Advanced Fixes – Configure Windows user accounts, service permissions, and reinstall QuickBooks Desktop if needed
Phase 1: Verify Initial Settings
Start by checking the server configuration, database services, and network sharing settings.
Fix 1. Check Hosting Settings on the Server and Workstations
Incorrect hosting settings can prevent workstations from connecting to the company file. Enable hosting only on the designated server.
On each workstation:
- Open QuickBooks Desktop
- Select File > Utilities
- Check the available hosting option
- If Stop Hosting Multi-User Access appears, select it
- If Host Multi-User Access appears, leave it unchanged
- Repeat these steps on every workstation
On the server:
- Open QuickBooks Desktop
- Select File > Utilities
- If Host Multi-User Access appears, select it
- If Stop Hosting Multi-User Access appears, do not select it
- Confirm that only the designated server hosts the company file
Fix 2. Check QuickBooks Database Services
QuickBooksDBXX and QBCFMonitorService help manage company file access. Both services should have the correct startup settings.
- Press Windows + R
- Enter services.msc and press Enter
- Find QuickBooksDBXX in the Services window
- Double-click the service
- Set Startup Type to Automatic
- Check whether the service status shows Running
- Select Start if the service has stopped
- Open the Recovery tab
- Set First failure to Restart the Service
- Set Second failure to Restart the Service
- Set Subsequent failures to Restart the Service
- Select Apply, then OK
- Repeat these steps for QBCFMonitorService
- Restart the server and check both services again
Fix 3. Install or Verify QuickBooks Database Server Manager
Database Server Manager helps the server share company files across the network. A missing or damaged installation can interrupt hosting.
- Open the Windows Start menu
- Search for QuickBooks Database Server Manager
- Check whether the matching version is installed
- Check for the QuickBooksDBXX or QBDBMgrN service
- If missing, run the matching QuickBooks installer as administrator
- Choose Custom and Network Options instead of Express
- Select the appropriate server installation option
- Install Database Server Manager
- Restart the server
- Confirm that the database service is running
- When hosting multiple versions, install the oldest version first
Fix 4. Enable Network Discovery and File Sharing
Windows must allow computers to find each other across the network. Network Discovery and File and Printer Sharing help establish this connection.
- Open Windows Control Panel
- Select Network and Sharing Center
- Choose Change advanced sharing settings
- Expand the active network profile
- Turn on Network Discovery
- Turn on File and Printer Sharing
- Review password-protected sharing settings
- Save the changes
- Confirm that the company file folder is shared
Phase 2: Use QuickBooks Troubleshooting Tools
The next phase checks damaged network files and company file problems. These steps also refresh the server’s folder information.
Fix 5. Rename the .ND and .TLG Files
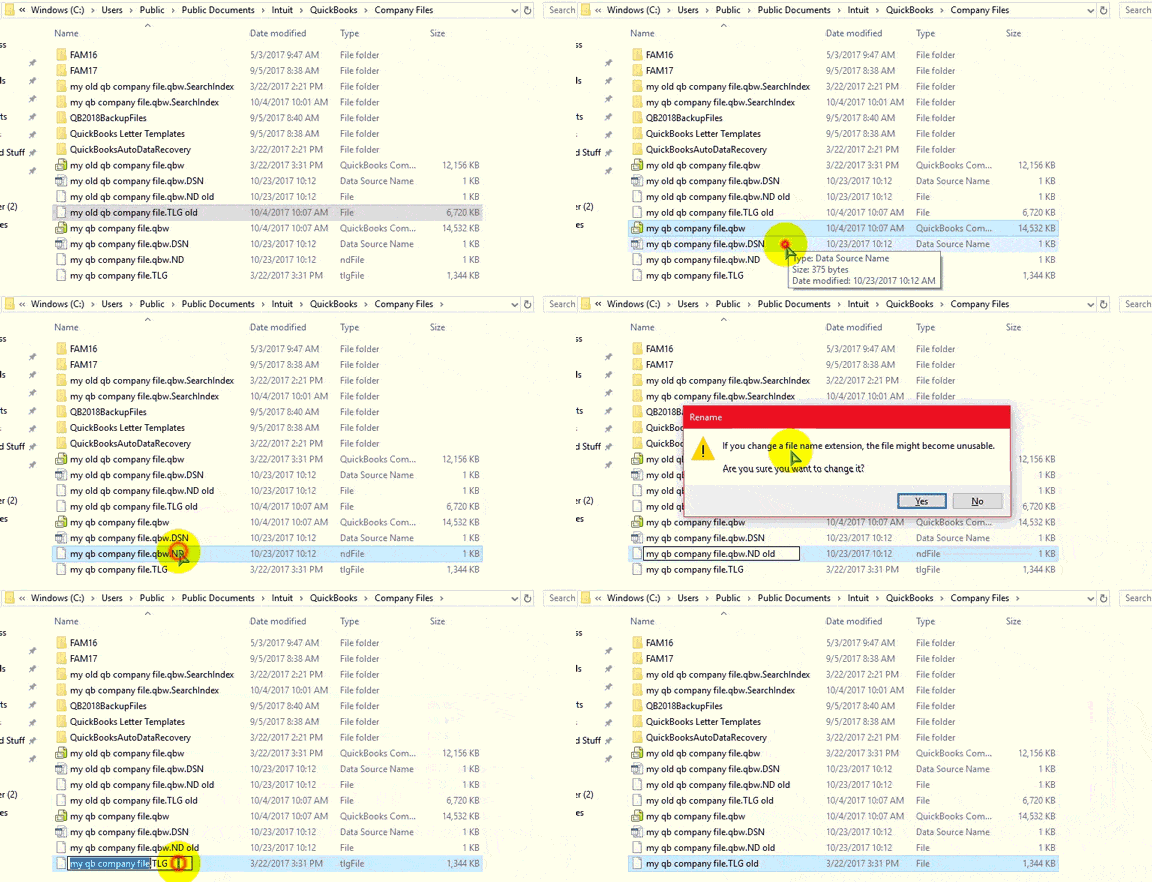
The .ND file contains network connection information for the company file. The .TLG file stores transaction log information. Damaged files can interrupt network access.
- Open the folder containing the QuickBooks company file
- Locate the matching .ND file
- Locate the matching .TLG file
- Right-click the .ND file and select Rename
- Add .OLD to its existing name
- Repeat the process for the .TLG file
- Do not delete or rename the original .QBW company file
- Reopen QuickBooks
- Scan the company file folder using Database Server Manager
Fix 6. Run QuickBooks File Doctor
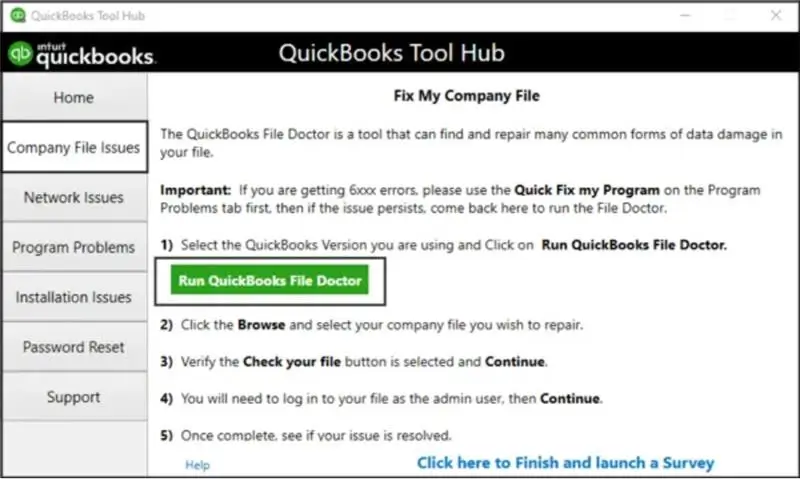
QuickBooks File Doctor checks company file damage and network connection problems. It can help when the QuickBooks file doctor hosting mode is off issue appears.
- Open QuickBooks Tool Hub
- Select Company File Issues
- Click Run QuickBooks File Doctor
- Wait for the tool to open
- Select your company file from the list
- Choose Browse and search if the file is missing
- Select Check your file
- Click Continue
- Enter the QuickBooks administrator password
- Select Next
- Allow the scan and repair process to finish
- Reopen the company file and check access
Fix 7. Scan Company File Folders Using Database Server Manager
A folder scan helps Database Server Manager locate company files and refresh network information.
- Open QuickBooks Database Server Manager
- Select the Scan Folders tab
- Choose Browse
- Locate the folder containing the company file
- Select the folder and click OK
- Click Start Scan
- Wait for the scan to finish
- Check the Company Files Found section
- Confirm that the company file appears
- Verify that the required .ND file is available
- Try opening the company file from a workstation
Phase 3: Perform System and Network Checks
Check folder access, firewall rules, and network communication. These settings can prevent the server from sharing company files.
Fix 8. Check Company File Folder Permissions
QuickBooks service accounts need suitable access to the company file folder. Incorrect permissions can block reading and writing.
- Open File Explorer
- Locate the folder containing the company file
- Right-click the folder and select Properties
- Open the Security tab
- Select Advanced
- Find QBDataServiceUserXX
- Select Edit
- Check that these permissions are allowed:
- Traverse Folder/Execute File
- List Folder/Read Data
- Read Attributes
- Read Extended Attributes
- Create Files/Write Data
- Create Folders/Append Data
- Write Attributes
- Write Extended Attributes
- Read Permissions
- Grant Full Control where required
- Select Apply, then OK
- Open the folder’s Sharing tab
- Grant the required service account access
- Review the relevant QuickBooks program and data folders
Fix 9. Configure Windows Firewall and Antivirus Settings
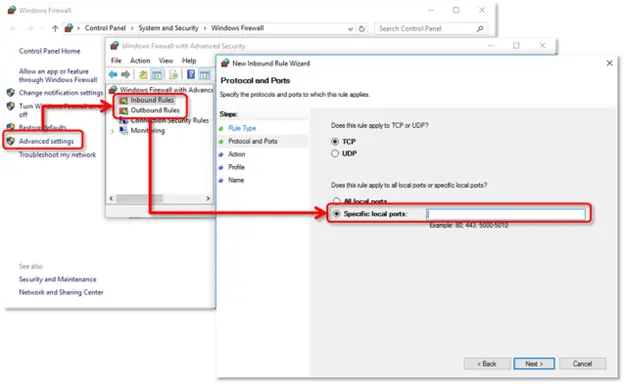
Windows Firewall can block the network traffic QuickBooks needs. Antivirus software may also restrict QuickBooks programs or shared folders.
- Open Windows Defender Firewall with Advanced Security
- Select Inbound Rules
- Choose New Rule
- Select Port
- Choose TCP
- Enter the required QuickBooks ports
- Select Allow the Connection
- Choose the appropriate network profiles
- Name and save the rule
- Repeat the process under Outbound Rules
- Allow the required QuickBooks applications
- Review antivirus and endpoint protection settings
- Make sure security software does not block QuickBooks files
- Add suitable QuickBooks folders and applications to exclusions
Fix 10. Verify Firewall Ports and QuickBooks Executable Files
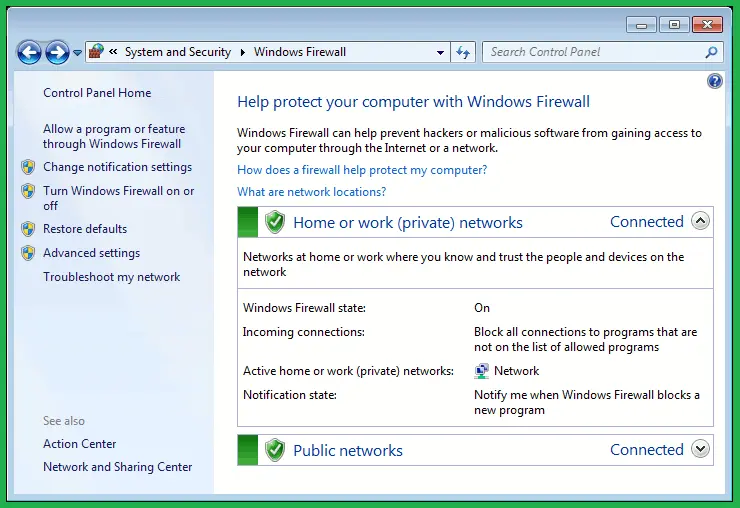
QuickBooks uses specific TCP ports for network communication. The required ports depend on your Desktop release.
QuickBooks Desktop firewall ports
| QuickBooks version | Required TCP ports |
| 2022 and later | Port assigned dynamically by Database Server Manager |
| 2021 | 8019 and assigned dynamic port |
| 2020 | 8019 and assigned dynamic port |
| 2019 | 8019 and assigned dynamic port |
| 2018 | 8019, 56726, 55368–55372 |
For newer releases, check the assigned dynamic port instead of guessing.
Find the dynamic port:
- Open the Windows Start menu
- Search for QuickBooks Database Server Manager
- Open the Port Monitor tab
- Find your QuickBooks version
- Note the assigned port number
- Use that port when creating firewall exceptions
Allow these QuickBooks executable files:
- QBW32.exe
- QBDBMgrN.exe
- QBCFMonitorService.exe
- QBServerUtilityMgr.exe
- QBLaunch.exe
- AutoBackupExe.exe
Fix 11. Check Network Connectivity and IP Addresses
A workstation must communicate with the server to open a shared company file. Use the ping command to test this connection.
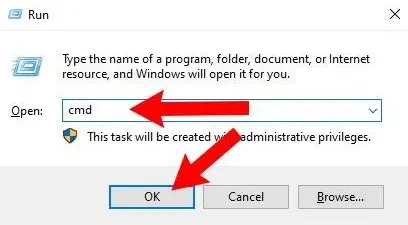
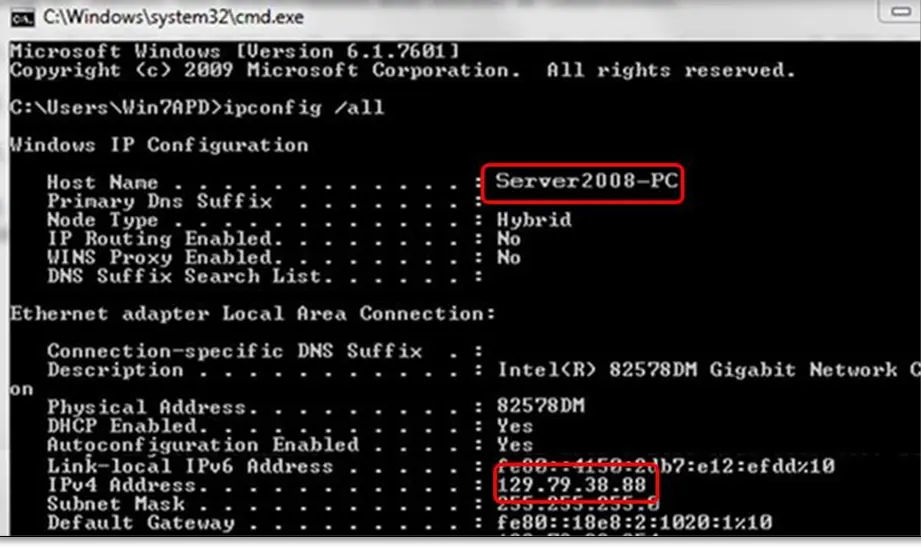
Find the server hostname and IP address:
- Open the Windows Start menu on the server
- Search for Run and open it
- Enter CMD and press Enter
- Type ipconfig /all
- Press Enter
- Find the server hostname
- Note the server IPv4 address
Test the server from a workstation:
- Open Command Prompt on an affected workstation
- Enter ping followed by the server hostname
- Press Enter
- Repeat the test using the server IP address if needed
- Check whether the workstation receives replies
- Review packet loss, timeouts, and connection delays
Fix 12. Edit the Windows Hosts File
The Windows Hosts file connects computer names with their IP addresses. Incorrect entries can prevent workstations from finding the server.
- Find the server IP address and hostname
- Identify workstation IP addresses and hostnames when needed
- Close QuickBooks Desktop
- Open C:\Windows\System32\drivers\etc
- Run Notepad as administrator
- Open the Hosts file
- Add the correct IP address followed by the computer hostname
- Save the changes
- Repeat the required entries on the server and workstations
- Reopen QuickBooks and test the company file connection
Phase 4: Apply Advanced Fixes
Use these advanced steps when the earlier checks do not restore access.
Create a Windows User Account and Configure Service Permissions
A Windows account may need administrator privileges for certain hosting configurations. QuickBooks service accounts also need access to shared company files.
- Open Windows Settings
- Select Accounts
- Choose Family and other users
- Create a local Windows account
- Assign administrator privileges where required
- Open Control Panel
- Find QBDataServiceUserXX
- Review and configure its required permissions
- Repeat for each installed Database Server Manager version
- Review QBCFMonitorService permissions
- Restart the computer
- Test company file access
Perform a Clean Reinstallation of QuickBooks Desktop
A damaged installation may prevent database services from working correctly. A clean reinstall replaces damaged program files and restores the installation.
- Create a backup of the company file
- Uninstall QuickBooks Desktop
- Remove remaining installation files using the clean-install process
- Obtain the compatible QuickBooks installer
- Run the installer as administrator
- Choose Custom and Network Options
- Select the correct multi-user or server installation option
- Complete the installation
- Restart the computer
- Reconfigure hosting settings
- Confirm Database Server Manager is running
- Scan the company file folder
- Test multi-user access
Read More:- Install QuickBooks Desktop
How to Verify That QuickBooks Hosting Mode Works Correctly
After completing the fixes, test hosting from the server and workstations.
- Open QuickBooks Desktop on the server
- Confirm Stop Hosting Multi-User Access appears
- Open QuickBooks Desktop on each workstation
- Confirm Host Multi-User Access appears
- Check QuickBooksDBXX and QBCFMonitorService
- Confirm Database Server Manager scans the company file successfully
- Open the shared company file from a workstation
- Switch to Multi-User Mode
- Test access from multiple workstations
- Confirm users can work without H-series connection errors
Tips to Prevent QuickBooks Hosting Mode Problems
Regular checks help reduce interruptions and protect your accounting workflow.
- Keep QuickBooks Desktop versions compatible across computers
- Install matching Database Server Manager releases
- Enable hosting only on the designated server
- Keep hosting disabled on workstations
- Monitor QuickBooksDBXX and QBCFMonitorService
- Maintain correct QBDataServiceUserXX permissions
- Store company files in shared folders
- Maintain stable wired network connections
- Review firewall and antivirus exceptions
- Keep Network Discovery and File and Printer Sharing enabled
- Back up company files regularly
- Check network connectivity when users report access problems
When Should You Contact Accounting Assist Pro?
Some hosting problems require a closer review of your accounting setup. Accounting Assist Pro helps businesses manage accounting systems and maintain reliable financial workflows.
Consider professional assistance when:
- Hosting remains disabled after the troubleshooting steps
- Workstations cannot connect to the company file
- Database Server Manager cannot scan the company file
- QuickBooks database services repeatedly stop
- Company file access or permissions remain problematic
- Your business needs help reviewing its QuickBooks Desktop setup
- You need support with bookkeeping, accounting, or financial reporting workflows
Conclusion
QuickBooks Hosting Mode is Off can prevent employees from accessing shared company files. Incorrect hosting settings, stopped database services, damaged network files, and firewall restrictions can cause this issue. Contact Accounting Assist Pro for help reviewing your accounting processes and improving your financial workflows.
Frequently Asked Questions
1. What does QuickBooks Hosting Mode is Off mean?
It means the computer hosting your company file is not configured for multi-user access. Workstations may fail to connect until the server settings are corrected.
2. Why is QuickBooks Hosting Mode turned off?
Incorrect server settings, stopped database services, damaged network files, and firewall restrictions can cause this problem. Multiple hosting computers can also interrupt network access.
3. How do I turn on hosting mode in QuickBooks Desktop?
Open QuickBooks on the server and select File > Utilities. Choose Host Multi-User Access if that option appears. Keep hosting disabled on workstations.
4. Should hosting mode be enabled on every workstation?
No. Only the designated server should host the shared company file. Workstations should use the Not Hosting setting to access the server.
5. What is the QBDBMgrN service in QuickBooks?
QBDBMgrN is a QuickBooks database manager program. It helps manage company file access in a multi-user network environment.
6. How do I restart QuickBooks Database Server Manager?
Open Windows Services by entering services.msc in Run. Find QuickBooksDBXX, check its startup type, and select Start if stopped.
7. Can firewall settings cause a QuickBooks Hosting Mode Error?
Yes. Firewall rules can block the ports and programs required for network access. Configure the correct TCP ports and application exceptions for your QuickBooks version.
8. How do I check whether QuickBooks hosting is working correctly?
Check the hosting options on the server and workstations. Then scan the company file and test access from multiple computers.
9. Can QuickBooks File Doctor fix the hosting mode problem?
QuickBooks File Doctor can check company file damage and network connectivity problems. Run the tool through Tool Hub, then test multi-user access again.
10. What should I do if the hosting mode is disabled after troubleshooting?
Check the database services, folder permissions, firewall rules, and server connection again. If the problem continues, review the installation and hosting configuration.